Karaoke Robot Judge
Our final project included a Fast Fourier Transform (FFT) of a user's voice displayed on a TFT display, a midi music file played through a DAC, a robot made of two servos, and a python GUI. The firmware was written in C for the PIC32MX530F128H microcontroller.
For the Spring 2021 semester, ECE 4760: Designing with Microcontrollers at Cornell University was held remotely. Because of this, we needed to figure out a way to use the existing lab setup -- which included a TFT display and servos -- and Zoom. Thus, for our final project, Kristin Lee and I created the Karaoke Robot Judge. The following report is taken from our final project website, which was written by Kristin Lee and myself.
Introduction
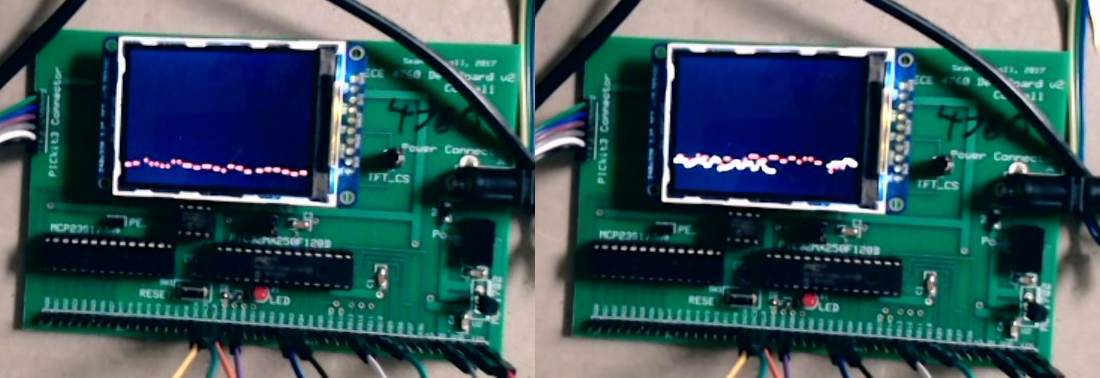
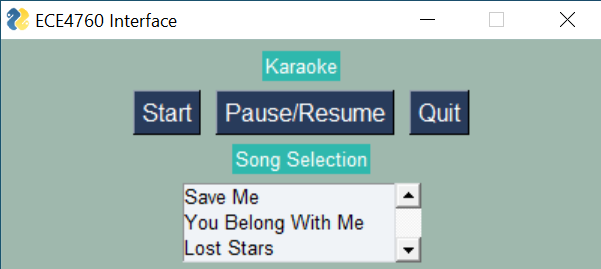
Karaoke Robot Judge is a karaoke machine with a robot Simon Cowell as a judge. For this project, we designed a karaoke machine on the PIC32 with a robot judge made of two servo motors. The user can choose one of three songs to sing from the Python GUI. The background audio is played from the DAC while the vocal melody is displayed in red on the TFT. As the user sings, their voice is also displayed on the TFT in white, so they can see how accurate their singing is in relation to the actual melody. The robot listens to the user singing. If the user makes too many errors while singing, the robot turns away from the camera; otherwise, the robot will bop its head to the music.
Project Website and Github
High Level Design
Project Idea
Since we were partners for two major projects (that of ECE 5725 and this one), Kristin and I wanted to work on two vastly different projects. Additionally, this class was held remotely, so we were constrained by the limitations of being unable to access the physical project setup in person. The idea for this project stemmed from our mutual love for music and the comedic element of having a robot judge your singing ability.
Background Math
The main calculations in our project occurred when doing Direct Digital Synthesis (DDS) in the Timer4 Interrupt, as well as calculating the displayed vocal melody in the display thread.
In order to output sound from the DAC, we used a Timer4 Interrupt with DDS. Since we wanted to be able to play chords, we had three separate DDS units. For each note, we used a linear ramp down such that the note's amplitude would slowly decrease to zero over the course of its duration. We did this by multiplying each note output by a scaler that was defined as (duration remaining)/(total duration of the note). In addition, we also scaled our sine table lookup such that there would not be any overflow with the DAC output since we were playing up to three notes at a time.
For the display thread, we used an FFT function to find the frequency with the maximum amplitude from the ADC samples. This was how we calculated the note the user was singing and displayed it on the TFT. For the actual vocal melody, we scaled the note by 0.128, which was (ADC samples)/(sampling frequency) = 512/4000, before drawing it on the TFT screen.
Logical Stucture
We implemented Karaoke Robot Judge in C for the PIC32 microcontroller. We used the protothreads library to implement several threads which yielded until user input or until they were triggered by events. For example, the display thread yielded until 512 ADC samples were gathered and sampling was set to one. The threads related to the Python GUI all yielded until there was user input. We used timers 2-5 in order to generate the DAC output, sample the ADC, and control the servo motors for the robot. Timer4 was used for the DAC output, Timer5 was used for ADC sampling, and Timer23 was used to control the robot. We used the graphics library and the TFT LCD display to draw the vocal melody, as well as the user's singing. The Python GUI was written in Python using the pySimpleGUI library. The GUI communicated with the PIC32 over serial on port COM4. The user could pick a song, play, pause/resume, and quit the program through the GUI.
Hardware/Software Tradeoffs
Since this project was completed remotely over Zoom, there were latency issues when it came to both the audio and the display on the TFT screen. For the audio, there was both latency with regards to the background music from the DAC being heard by the user, as well as the user's voice being heard by the ADC. Similarly, with the video latency, there was delay with regards to the timing between when the melody was displayed on the TFT and when the user would actually see it over Zoom. In addition, the audio and video latency were not always the same, and the latency would change throughout the Zoom call. We tried our best to compensate for the latency through trial and error with regards to display timing.
We also had some memory issues with regards to the PIC32. Since we had multiple MIDI files, we needed to store header files with large 2D arrays in memory. However, the memory on the PIC32 is limited. We stored the arrays in flash memory as constants instead of main memory because of the faster access time and to reduce the amount of main memory used. However, we still ran into memory issues when trying to store our third song. As a result, we removed some of the columns from the arrays in order to free up space, which resulted in slight changes in logic.
Standards and Copyright
Serial communication from the Python interface to the PIC follows the RS-232 standard, and communication from the PIC to the TFT follows the SPI standard.
The MIDI files we used were either under the Creative Commons Attribution License, which means they are free to use as long as the creator is attributed, or they were free to download. In addition, we made some of our own MIDI files, so we do not believe we are infringing on any copyright.
We attribute the background music for "Save Me" and "Lost Stars" to ATs Magic Shop on YouTube. We also attribute intellectual property to Bruce Land and Hunter Adams for the remote interface setup and FFT function, as well as to the authors of the various libraries we used.
Program and Hardware Design
Overall Software Design
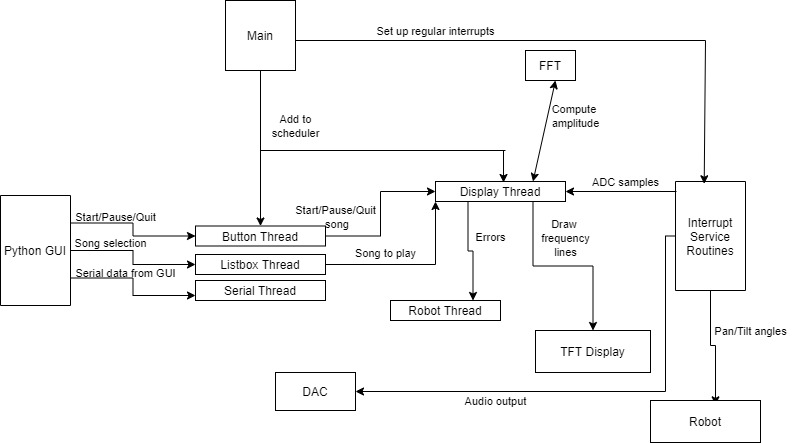
Our overall software design consisted of the Python GUI, the timer interrupts, and the protothreads. We had three main threads: serial, display, and robot. The serial thread took in user input from the Python GUI, such as the choice of song and whether or not to start it. When the user chooses a song from the listbox, the listbox thread saves the necessary values from the header file to play that song. The button thread captures which button was pressed and executes the corresponding logic, such as start or quit. The display thread used the ADC samples and the FFT function to compute the frequency with the maximum amplitude and displayed it on the TFT screen. In addition, it also displayed the vocal track based on the array in the header file. The logic for determining when the user had made too many errors was also in this thread. If the user made too many errors in a certain number of samples, the display thread would signal the robot thread. The robot thread controlled the movement of the servo motors. If the user was doing well, the robot would nod its head; otherwise, it would turn away from the camera. We also had a quit thread that simply disabled interrupts, cleared the TFT screen, and reset the necessary variables. The Timer4 interrupt controlled the DAC output logic. It used DDS to convert the MIDI notes in the array into sounds to be outputted by the DAC. The Timer5 interrupt collected the ADC samples and signaled the display thread to display them. The Timer3 interrupt set the duty cycle of the servo motors. The servo motors actually used a 32-bit timer (Timer23), so the timing was controlled by Timer2, but the interrupt was based on Timer3.
Python GUI
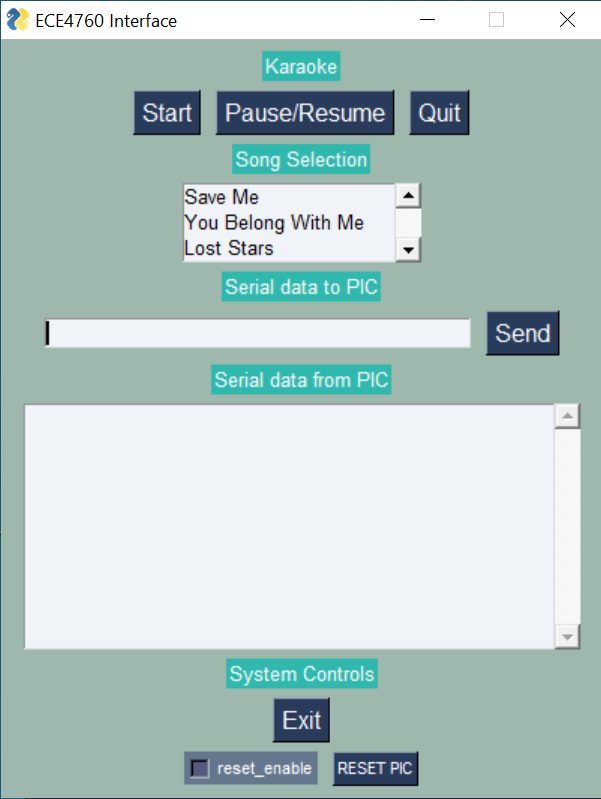
The Python GUI consisted of three buttons and a listbox. The buttons were "Start", "Pause/Resume", and "Quit", respectively. The listbox contained three different songs to choose from.
When the user selected a song, the listbox thread would set several variables that corresponded to the chosen song. For example, we set a pointer to the background track array, a pointer to the vocal track array, the time signature, the sizes of the arrays, etc. This allowed the program to know which arrays to read from and which values to use when computing the logic.
When the user pressed a button, the button thread would execute logic based on which button was pressed. If the "Start" button was pressed, the thread would enable interrupts and tell the program to start the track by setting the start variable to one. If the "Pause/Resume" button was pressed, the thread would first check whether or not the program was already paused. If the program was not paused, then it would disable interrupts and set the pause variable to one. Otherwise, it would reenable interrupts and set pause to zero. If the "Quit" button was pressed, the program would enter the quit thread. This thread would disable all interrupts, clear the TFT display, and reset all necessary variables back to their original value. This way the user could pick a new song to play.
Python Scripts
We had several Python scripts to convert the MIDI files into CSV files with our desired columns. We could then copy and paste these files as arrays in our header files on the PIC32. We used the py-midicsv library to directly convert the MIDI files into CSV files. This code can be seen in the miditocsv.py file. It simply converts the MIDI file into a CSV file and writes it to a new file. Since this file was a direct conversion from the MIDI file, it had a lot of extra information that we did not need for our program.
The next script we had was sort_csv.py. This file reads the converted CSV file and writes a new file that only has the Note_on_c, Note_off_c, and tempo events. This file also sorts the events based on their timing in MIDI clicks.
We then had a script called duration.py, which was used to calculate the duration of each note. Since the converted MIDI file did not explicitly include the duration of each note, we had to calculate it based on either when the velocity of the note became zero or when there was a Note_off_c event for that note. Again, the events were sorted based on their timing in MIDI clicks. If the MIDI file was the background music, curly braces were added at the beginning and end of each row to make copying and pasting easier. The result was then written to a new file.
The last script we needed was gaps.py. This file was only used for the vocal tracks. In order to display the vocal track properly on the TFT, we needed to know when there were gaps between the notes. As a result, we needed this file to manually insert gap events into the CSV file. Like the previous files, this one was also sorted by MIDI click timing. In addition, curly braces were added at the beginning and end of each row to make copying and pasting into the header files easier.
We also had a Python script called csvtomidi.py which converted a CSV file back to a MIDI file. This file was only used for testing purposes because we wanted to be able to modify the CSV file and make sure that the music still sounded okay without having to reprogram the PIC32.
Header Files
The csv files were put into header files as 2D static const unsigned int arrays. For the song tracks that were meant for the DAC, each row was structured as either {start time in midi clicks, midi note, duration in midi clicks}, or {time in midi clicks, midi tempo, 0}. For the vocal tracks that were meant for the TFT display, each row was structures as {midi note, duration in midi clicks}. In addition to these arrays, both headers saved the time signature as static const unsigned _Accum and size of the array as static const unsigned int. Additionally, the main song track saved the midi header value as a static const unsigned int, and the song vocal header saved the tempo and midi start time of the track as static const unsigned ints.
The header file midi_lookup was simply a static const _Accum array that held the frequencies of midi notes.
Interrupts
We used three interrupts: one for the ADC, one for the DAC, and one for the robot. The DAC interrupt had a priority of 3, the ADC had a priority of 4, and the robot had a priority of 5.
The DAC Interupt
The DAC interrupt for handling midi playback was handled by Timer4. This timer's period was set to 1000, or 40MHz/40kHz (clock rate / sample rate), to give a sampling rate of 40kHz. This was close to the standard audio sampling rate of 44.1kHz.
Within the interrupt, the entirety of the code was within an if statement that looked at the state of the variable start, with the exception of clearing the interrupt flag. This start variable was set in the button thread when the user pressed either start or quit. If start was 1, then the interrupt then ensured that the program was not going to access an array outside of its bounds. If the program was still within the bounds of the song array, it checked to see whether the midi time matched the start time of the vocal track. If it had, then it signaled the display thread to begin displaying.
To keep track of the time, multiple variables were used. Since the ISR was sampling at a much faster rate than the song array needed to be accessed, we had to convert from the midi clicks per second to the number of ISR samples per click. Every time the ISR encountered a row that contained tempo, samples_per_click was recalculated. The calculations are below:
bpm [quarter notes/min] = (60E6 [us/min]) / (tempo [us/quarter note])
(bpm [quarter notes/min]) / (60 [s/min]) = [quarter notes/s]
[quarter notes/s] * (time sig [clicks/quarter note]) = [clicks/s]
(2000 [samples/s]) / [clicks/s] = [samples/click]
The variable sample_count was used to keep track of the number of ISR samples. This was incrememnted every time the ISR ran given that start equaled 1 and the row was still within the bounds of the song array. midi_count was used for keeping track of midi time in midi clicks. To increment midi_count, sample_count was first checked to see whether it had exceeded the number of samples per midi click. If it had and the file was not at the very beginning of the file, it then checked to see whether the row before it had the same time as the current row. This was done because we had up to 3 notes playing at a time and we did not want to skip any notes. If no notes would be skipped, then midi_count would be incremented to be the next midi click.
If the midi time of the current row of the song array was the current midi_count, then the interrupt played the note. This was done by first checking to see whether the row contained a tempo or a note. The midi notes could not exceed 127, so a simple comparison of that value was enough to determine if the row contained a tempo. If it did, then the tempo calculations from above were done. If the row contained a note, the program checked to see which DDS unit was free by seeing if the DDS amplitude was 0. The program then used the midi_lookup table to convert from the note to a frequency and calculated the phase_incr variable. The duration of the note was calculated as explained in the Background Math section. Finally, the amplitude was set to 1.
Given that start equaled 1 and the row was still within the bounds of the song array, the DAC data was updated every time. Each phase accumulator was incrememnted by its phase_incr value, and the amplitude was scaled by the linear envelope. The sine table was then accessed at the phase accumulator value shifted by 24 and multiplied by the new amplitude to provide a new data value for each DDS unit. The sine table was scaled in main to never overflow, provided that the maximum value of each DDS unit was 1. This process created three digital sine waves, one for each unit. Each DDS unit's data was added together to be one data output. This value was added to 2048 so that its range was from 0 to 4096, then OR-ed with the DAC control bits. This was then sent over the SPI to the DAC. This was what allowed the PIC to play 3 notes at once. Once all three DDS units had 0 amplitude, the song was finished and the quit thread was signaled.
There were two major changes for this interrupt. Initially, we planned to be able to scale the notes based on their velocity. However, we ran out of space and had to take out the velocity column in the midi file, so all of the notes in our midi files instead had the same amplitude. Additionally, we originally planned on having a trapezoidal envelope instead of a linear one. However, after implementing the trapezoidal envelope, we discovered that we preferred the linear envelope's music box sound as opposed to the trapezoidal envelope's flute sound.
The ADC Interrupt
The ADC interrupt for sampling the singing was handled by Timer5. This timer's period was set to 10000, or 40MHz/4kHz (clock rate / sample rate), to give a sampling rate of 4kHz. This value was chosen because the range of highest note that the user sings does not exceed 2kHz. Thus, 4kHz was the smallest frequency we could sample at due to the Nyquist rule.
The setup of this interrupt was very similar to the lab 3 interrupt. The variable channel4 read the result of the channel 4 conversion of the ADC from the idle buffer on each ISR sample. If the ISR had not yet reached 512 samples, the sample was scaled by the hann window and then placed into an array. This made the samples periodic over the sample window. ADC_count, a variable that contained the number of ADC samples, was incremented.
The Robot Interrupt
The robot interrupt was handled by the Timer23, as mentioned before. Timer2 handled the timing, and its period was set to 80000, or 40MHz/50Hz (clock rate / sample rate), to give a sampling rate of 50Hz. Within this interrupt, the PWM outputs were set to the variables pan and tilt, which determined the position of the servos. robot_count, which will be discussed in the Robot Thread section, was incremented.
Threads
The threads that were implemented were the display thread, quit thread, robot thread, button thread, and listbox thread.
The Display Thread
The display thread was in charge of all of the TFT display. This thread yielded until the ADC had 512 samples, the program was not in the quit state, and the program was ready for sampling. It then disabled the interrupts for just the ADC. The scaled ADC samples were copied into a different array called fr and the interrupts were reenabled to allow the ISR to refill the array. The variable ADC_count was set back to 0 at this point. Next, it populated an array called fi with zeros. Both fr and fi were passed into the FFTfix function which computed the FFT of the audio samples. This code was adapted by the ECE 4760 class by Tom Roberts and Malcolm Slaney. The code is in the References section below. After the FFT was taken, the alpha max beta min algorithm was used to get the magnitude of the FFT.
|amplitude|=max(|Re|,|Im|) + 0.4∗min(|Re|,|Im|)
We only needed to compute the magnitude for the first half of the values in the array since the FFT is mirrored for real-valued signals. While we were computing the magnitude of the FFT for the array values, we were also checking for the frequency with the maximum amplitude.
This program used the entire TFT screen to display the vocal samples and midi vocal track and moved in a scrolling fashion. Every time the column that was being drawn reached the end of the screen, it was reset back to 0. The x-axis represented time and the y-axis represented frequency.
To display the midi melody line, the timing of the track needed to be scaled both to fit the TFT screen and to match the timing of the song backtrack. The ADC samples at 2000 samples/s and signals
the display thread every 512 samples. Thus, the TFT updates every 3.9. Thus, (320 [columns]) / (3.9 [samples/s]) means that there were 0.48 s per window. By mutliplying this value by the number of
midi clicks per second (calculated in the ADC ISR), this value was then converted to the number of midi clicks per TFT window. Every sample had a rectangle of variable length
draw_length pixels in width drawn on the TFT. Additionally, every song had its own prescaler, which was set in the listbox thread and
used for individual tweaking of the timing. In the end, a scaling factor mel_scale was set as
mel_scale = (_Accum)prescaler*(_Accum)draw_length/(clicks_per_sec*20.48). The variable decrement was also unique to each song and helped determine how quickly the melody iterated
through its array. The variable draw_length was set to 5 pixels. If the note duration became less than or equal to 0, that note was finished displaying and a the next note was displayed.
The display worked by first clearing the columns that were being redrawn as well as 10 columns in front of it, then drawing either a gap or note 5 pixels at a time. The program then decremented the duration of the note by the decrement value, which was set within the listbox thread. The frequency of the note was multiplied by the value 0.128 (as mentioned in the Background Math section above), negated, and added to 230 to be seen on the TFT. The frequency was found through the midi_lookup table. A red rectangle 5 pixels tall and 5 pixels wide was drawn at the coordinates for the column and scaled note.
If the maximum amplitude of the FFT was not 0, meaning there was vocal input, then the frequency with the maximum amplitude was negated and added to 230 to be drawn at the same column as the melody line. A white rectangle of width and height 5 pixels was drawn at the coordinates for the column and scaled frequency.
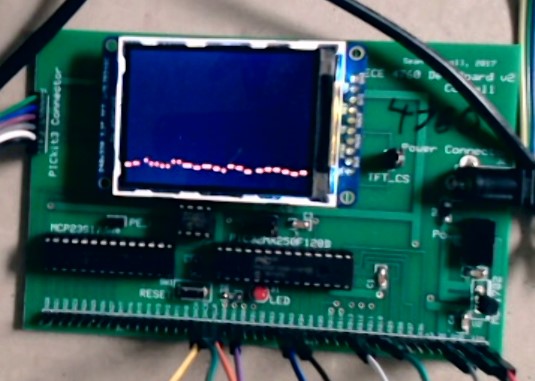
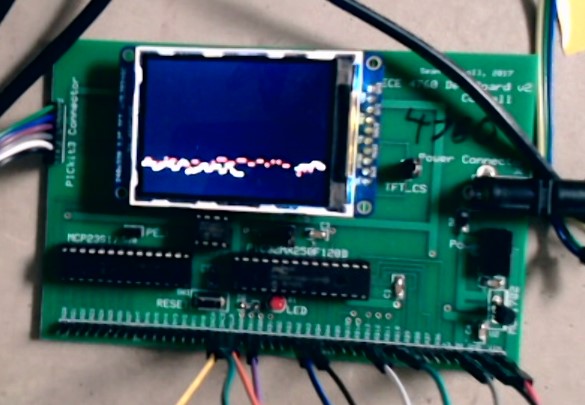
The display thread also handled the logic for the robot judgement. We did not want the robot to be too sensitive, the program would look at the accuracy of 60 counts at a time. For each count, if the user either did not sing or was out of tune, the variable wrong_count was incremented. If wrong_count was greater than or equal to 30 (if over half of the counts were inaccurate), then the program would alert the robot by setting the variable wrong to 1. This also set the variable robot_count to 0. After 60 counts, both counters were reset. To determine if the user was out of tune, the frequency of the melody note was compared to the frequency of the maximum amplitude of the FFT. If the difference between teh two was larger than 200Hz, wrong_count was incremented. To allow for the user to take breaths, a variable called breath_count was incremented every time the frequency of the maximum amplitude was 0Hz and reset to 0 every time vocal input was detected. If this value was greater than 10, wrong_count was incremented.
We originally planned on having the TFT refresh with a new section of the vocal track rather than having it scroll along with the user's singing. However, clearing the screen took too much time and caused significant delays and would cause the display and song track to be mismatched.
The Robot Thread
The robot thread determined the position of the servos. It was signaled by the ADC ISR when the midi count equaled the start time of the melody track. If the variable wrong was 1, pan and tilt were set to the default values of 30000 and 90000, respectively. This made the robot look like it was turning away from the camera. The robot looked away for 75 ISR samples, which was done by looking at the value of the variable robot_count. After this amount of time, wrong was set back to 0 to allow the user another chance to sing correctly.
If the user was in tune, then the robot would bop its head. Pan was set to a default value of 75000 to have the robot face the camera. The tilt position was then incremented and decremented as needed to move the robots head up and down.
The Quit Thread
The quit thread was signaled when either the song was finished or when the user clicked the quit button. This reset all of the variables used in the all of the ISRs and threads back to their default values.
The Button Thread
This thread waited until a button on the GUI was pressed by the user. There were four three buttons: start, pause/resume, and quit. The start button set start to 1 to signal the DAC ISR to start the midi playback and set quit to 0. This also enabled global interrupts. If the pause/resume button was clicked, it would either disable or enable global interrupts, based on its current state. The quit button signaled the quit thread and set start to 0, causing the DAC ISR to stop the midi playback.
The Listbox Thread
The listbox thread was used to select between the three songs, Save Me, You Belong with Me, and Lost Stars. For each of these, the song and vocal pointers were set to their respective song and vocal arrays. Additionally, the time signature, size, vocal tempo, vocal size, header, and vocal start variables were all set to their respective song variables. The prescaler and decrement for the melody line display was also set here.
Hardware
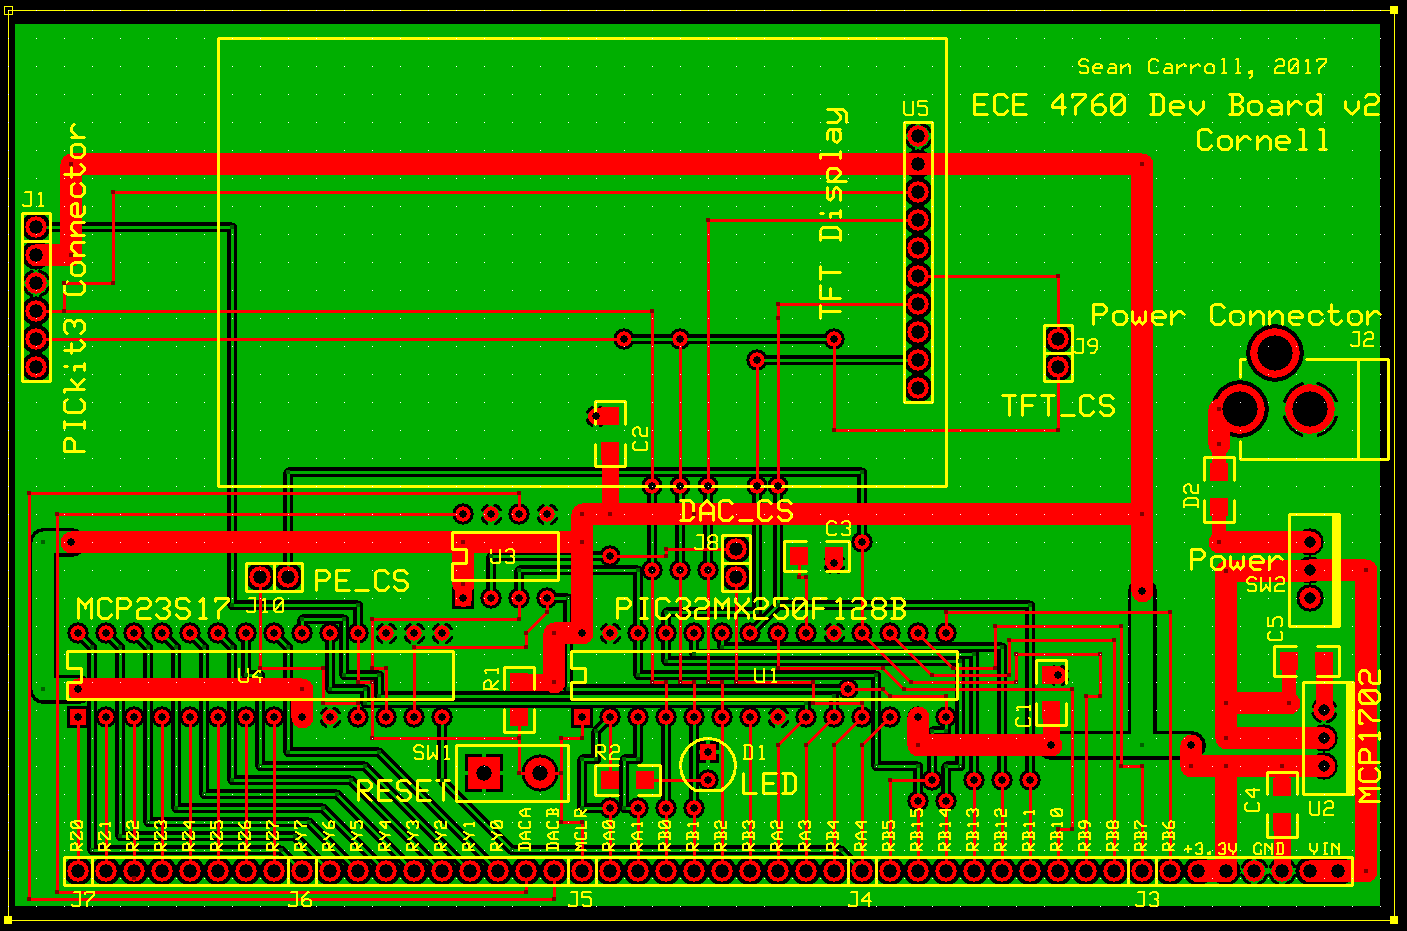
The hardware consisted of the Big Board, which includes a port expander, ADC/DAC, TFT header-socket, programming header-plug (Pickit3), TFT display, and power supply (Figures 7-8). The ADC was configured to sample channel AN11. The PIC32 communicated with the program over the COM4 port using serial. The DAC used the pins RB4 for the SPI chip select, RB5 for the SPI MOSI, and RB15 for the SPI Sclock. Two micro servos (SG90) were arranged to allow for pan and tilt. These servos were wired to RPA2 and RPA3 to allow for pulse width modulatio (PWM) control. RPA3 was used for pan and RPA2 was used for tilt. The TFT used RB0 for the D/C, RB1 for SPI chip select, RB2 for reset, RB11 for SPI MOSI, and RB14 for the SPI Sclock. We used Zoom to provide audio input to the ADC as well as view the TFT and robot.
All of the hardware was set up in the main function.
To set up the DAC, we opened Timer4 with OpenTimer4 from the peripheral library and set up the interrupt as described in the Interrupt section with ConfigIntTimer4. The CS pin was set to high, and the the MOSI pin was set up to allow for peripheral pin select. SDO2, in PPS output group 2, was configured to RPB5. The SPI channel was then opened.
To set up the robot, we opened Timer23 and used the macros for Timer2 in OpenTimer23 and the macros for Timer3 in ConfigIntTimer23 to set up the timer.
Next, we set up the out-put compare units in order to generate the PWM signals. We opened OC3 and OC4 with OpenOC3(OC_ON | OC_TIMER_MODE32| OC_TIMER2_SRC | OC_PWM_FAULT_PIN_DISABLE , 60000, 60000)
and OpenOC4(OC_ON | OC_TIMER_MODE32| OC_TIMER2_SRC | OC_PWM_FAULT_PIN_DISABLE , 60000, 60000).
We then configured the pins to allow for peripheral pin select. OC3 was configured to RPA3 and OC4 was configured to RPA2.
We also setup the ADC in main. The ADC Most of the ADC setup was the same as the TFT_FFT_ADC demo code (in References). The existing code was changed to turn auto sampling off and to use Timer5. The sine, sinewave, and hann window tables, which were used in the DAC ISR, FFT function calculations, and ADC ISR respectively. The equation for the Hann window calculation was
w(n)=0.5[1−cos(2*pi*n/512)]
where n was the index of the sample in the array.
Results
Overall our project performed well for all of our songs. We were able to see that the project was working both audially and visually by hearing the midi playback and seeing the melody line and FFT on the TFT display. Since the playback and sampling was all done in real time, there was some issues with lag due to Zoom. The worst case latency that we encountered over Zoom was around 40ms. Because of this, sometimes the vocal track display and the backtrack would not line up. Additionally, this would cause the display of the singing to be slightly delayed. As far as the robot judge, because of the way that we judged the accuracy of the singing, the robot would take around 1 second to properly react. While we did have to cast some frequencies to integers when they were decimal values, this was not an audible change.
There were no major safety concerns in this project due to the project being done entirely remotely.
There are not many usability concerns as the user interface is a simple GUI. Each button is labeled appropriately, making it easy to discern the purpose of each one.
Conclusions
In the end, we were very happy with our project. We were able to meet the majority of our goals that were set in the project proposal. We were able to successfully make a karaoke machine with a robot that judged you in real time. We were able to not only play a midi file with three notes at a time, but we were also able to display a separate midi track on the TFT along with vocal input. By having a script that would convert any midi file to an array for a header, users have the capability to add their own songs if they so choose. Additionally, having a robot judge allowed for a more enjoyable experience as it added a game element to the karaoke.
In the future, we would like to match the timing of the song backtrack, the singing, and the TFT display of the vocal input and the melody line better. Much of this problem was due to the lag that was caused through having to connect to the lab desktop remotely as well as having to send and receive all audio and visual information through Zoom, which had changing latency. Additionally, we did not have the time to look into or implement any pitch detection algorithms, which would have improved the detection of the singing. Both of these together would allow us to make the robot judge more accurately.
There are several intellectual property considerations. All of our midi files were either under the Creative Commons Attribution License, which means they are free to use as long as the creator is attributed, or they were free to download. Additionally, the code to calculate the FFT was from code provided by Bruce Land. This code was originally written by Tom Roberts and Malcolm Slaney. Additionally, ADC setup was adapted from Bruce Land's code. Some sections of the report are adapted from our own write ups from Labs 3 and 4 of this course. The code for the GUI was also adapted by code from this course.
We made sure to follow the IEEE Code of Ethics while working on this project. There are no safety issues involved with our project, even with anyone who is not knowledgeable about this project. We only began work on this project after our idea was reviewed by the instructors and teaching assistants of the course.